UniFi Dream Machine Pro + Vodafone NEBA
So it all started when I decided to change my ISP provided router for a more advanced and complete one, preferably having the router and access points separated in different devices. My ISP is Vodafone Spain and I get FTTH using NEBA, indirect fiber.
I remembered watching some videos about UniFi access points some time ago from Linus Tech Tips and a few others, so I checked out Ubiquiti's store. I immediately saw the Dream Machine Pro and Dream Machine, but after a quick comparison between both, I decided to go with the Dream Machine Pro. The main reason being that the Dream Machine Pro has a superior throughput with IPS/IDS enabled; 3.5 Gbps according to their webpage. Be aware that this might not be true when using PPPoE.
Once I decided to go with the Dream Machine Pro I needed the access point(s), and finally chose the U6-Lite, because I have some WiFi 6 devices and it has better speeds overall. I also had to buy a PoE injector.
Setup
Everything arrived, I plugged the Dream Machine Pro into an ethernet port in the Vodafone provided Sercomm H-500S router and started the setup. I saw some videos and posts where people claimed having problems through the initial setup, but it went all smoothly for me.
Replacing the Vodafone Router
Now it was time to replace the Vodafone router. To do so you need your PPPoE credentials and VLAN details. You can check the post I followed to obtain the credentials from the Sercomm H-500s here. In my case, Vodafone uses VLAN 24 for everything: Internet, VoIP, and IPTV.
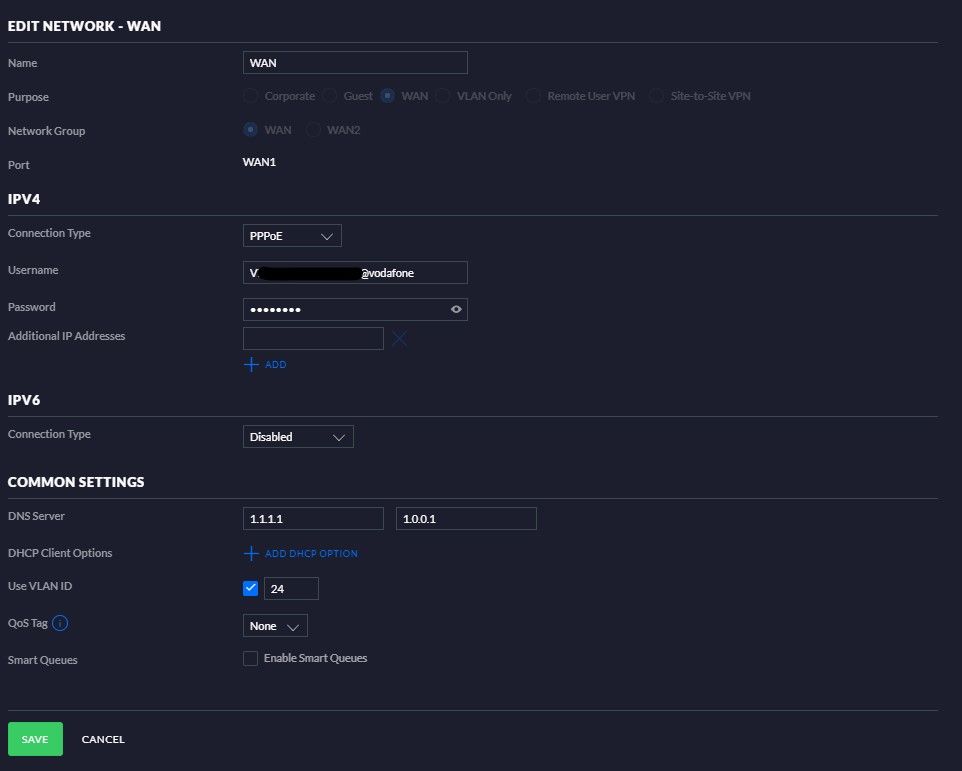
At this point, I already had internet connection with only the Dream Machine Pro on my LAN with IP range 10.69.1.1/24, so I was really happy.
VoIP
In order to get VoIP working, I just plugged in an ethernet cable from a LAN port in the Dream Machine Pro to the WAN port in the Vodafone router.
IPTV
Now, the difficult part: getting IPTV to work. I tried everything: plugging the IPTV deco to the Dream Machine Pro and to the Vodafone router. I could only use apps like Netflix or HBO, but no luck getting channels to work.
Multicast
After some research and help, I found that Neba IPTV is served from a separated multicast network, without PPPoE. That was a problem. The Dream Machine Pro did not support it. However, I was lucky enough to find that the beta kernel version 1.11.0-14 did support multicast. It was a beta version, but I installed it anyway.
IGMP Proxy
Having multicast did not fix the whole problem though. I needed a proxy such as IGMP-proxy to pass that multicast traffic to the Vodafone deco, and I found a GitHub repo that was what I was looking for. It had a few requirements:
- Having a compatible kernel version.
- Having UDM on_boot_script.
UDM on_boot_script is a utility that allows you to execute scripts when the Dream Machine Pro (re)starts. To install it you can follow the guide here.
With those requirements fulfilled, there are a few other changes that need to be done.
Creating a LAN
First of all, we need to create a separate LAN for the Vodafone deco. It is very important to have 192.168.0.1/24 as IP range and 212.166.210.80 / 212.166.132/104 as DNS. We also need to give it a VLAN (300 in my case, you can choose anything), add TIVO as the domain name, and enable both IGMP snooping and UPnP LAN.

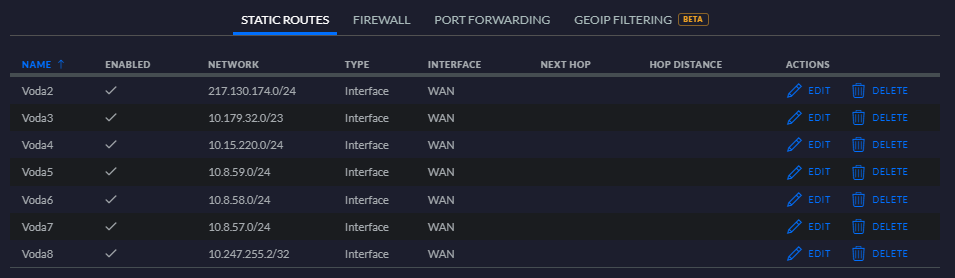
Static routes
I also created the static routes I found on the Vodafone router, but I am not sure it is 100% required.
UDM-IPTV
Now with all the requirements fulfilled, it was time to configure the udm-iptv container. You can find the script at /mnt/data/on_boot.d/15-iptv.sh if you followed the GitHub readme.
My configuration is the following:
IPTV_WAN_INTERFACE="eth8.24"
IPTV_WAN_RANGES="0.0.0.0/0"
IPTV_WAN_VLAN="0"
IPTV_WAN_DHCP_OPTIONS="-O staticroutes -V IPTV_RG"
IPTV_LAN_INTERFACES="br300"
IPTV_LAN_RANGES="192.168.0.1/24"

if podman container exists iptv; then
  podman rm -f iptv
fi
podman run --network=host --privileged \
    --name iptv -i -d --restart always \
    -e IPTV_WAN_INTERFACE="$IPTV_WAN_INTERFACE" \
    -e IPTV_WAN_RANGES="$IPTV_WAN_RANGES" \
    -e IPTV_WAN_VLAN="$IPTV_WAN_VLAN" \
    -e IPTV_WAN_DHCP_OPTIONS="$IPTV_WAN_DHCP_OPTIONS" \
    -e IPTV_LAN_INTERFACES="$IPTV_LAN_INTERFACES" \
    -e IPTV_LAN_RANGES="$IPTV_LAN_RANGES" \
    fabianishere/udm-iptv
IPTV_WAN_INTERFACE is the name of the WAN interface + the VLAN. eth8.X in case you are using the ethernet wan port, or eth9.X in case you are using the SFP+ port.
IPTV_LAN_INTERFACES is the interface we created for the TV. br300 in my case, but you can check yours using ip a in ssh and finding the interface with the network range we assigned.
Time to enjoy the TV, right? Well... no. If you execute the script you will notice that it does not work, and if you read the container logs you will see something like this:
udm-iptv: Obtaining IP address for VLAN interface...
ip: RTNETLINK answers: File exists
run-parts: /etc/network/if-pre-up.d/vlan: exit status 2
udm-iptv: NATing IPTV network ranges (if necessary)...
udm-iptv: Setting up igmpproxy..
udm-iptv: Starting igmpproxy..
adding VIF, Ix 0 Fl 0x0 IP 0x0101450a br0, Threshold: 1, Ratelimit: 0
There must be at least 1 Vif as upstream.This is happening because we are binding to eth8.24, but since we are using PPPoE, it does not have an IP, the IP is assigned to ppp0. However, we can not bind the proxy to ppp0, so what can we do? Well, this is a bit hacky and it has its own problems, but we can set an IP to eth8.24 using ip addr add 192.168.200.1 dev eth8.24. Eureka! We can now enjoy Internet, VoIP, and IPTV with a Dream Machine Pro!
It works! Until...
However, as I mentioned, adding an IP to eth8.24 using ip a has a problem: Every time you connect to the web interface of the Dream Machine Pro or it restarts, it will re-provision and it will lose the IP. To partially solve this I created another script at /mnt/data/on_boot.d/14-iptv-wan.sh with the command, so that at least when I restart I do not have to assign the IP again. I guess a cron job could be created with the command to fully solve this but I have not tested it myself.
Final thoughts
And this is it, this is how I managed to get everything working. I would like to give special thanks to https://github.com/fabianishere for the help with the IPTV part, apart from creating the image he was super helpful with issues I encountered.
Please let me know if you have any questions, comments, or suggestions. Feel free to contact me at: